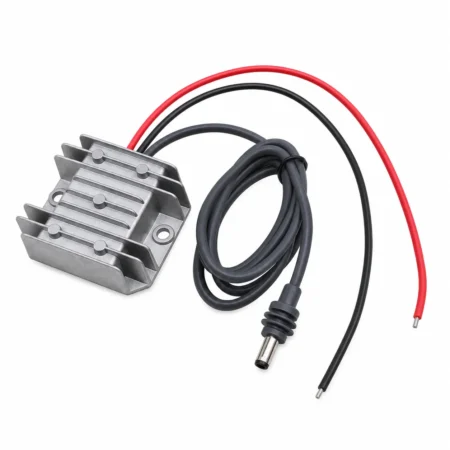
Power your Starlink Mini from a 12V leisure battery. Our Starlink Mini 12V DC power converter steps the battery supply up to 30V DC. View the converter below, or read on for battery wiring, solar charging and installation guidance.
FROM THE MOTORCABLES RANGE
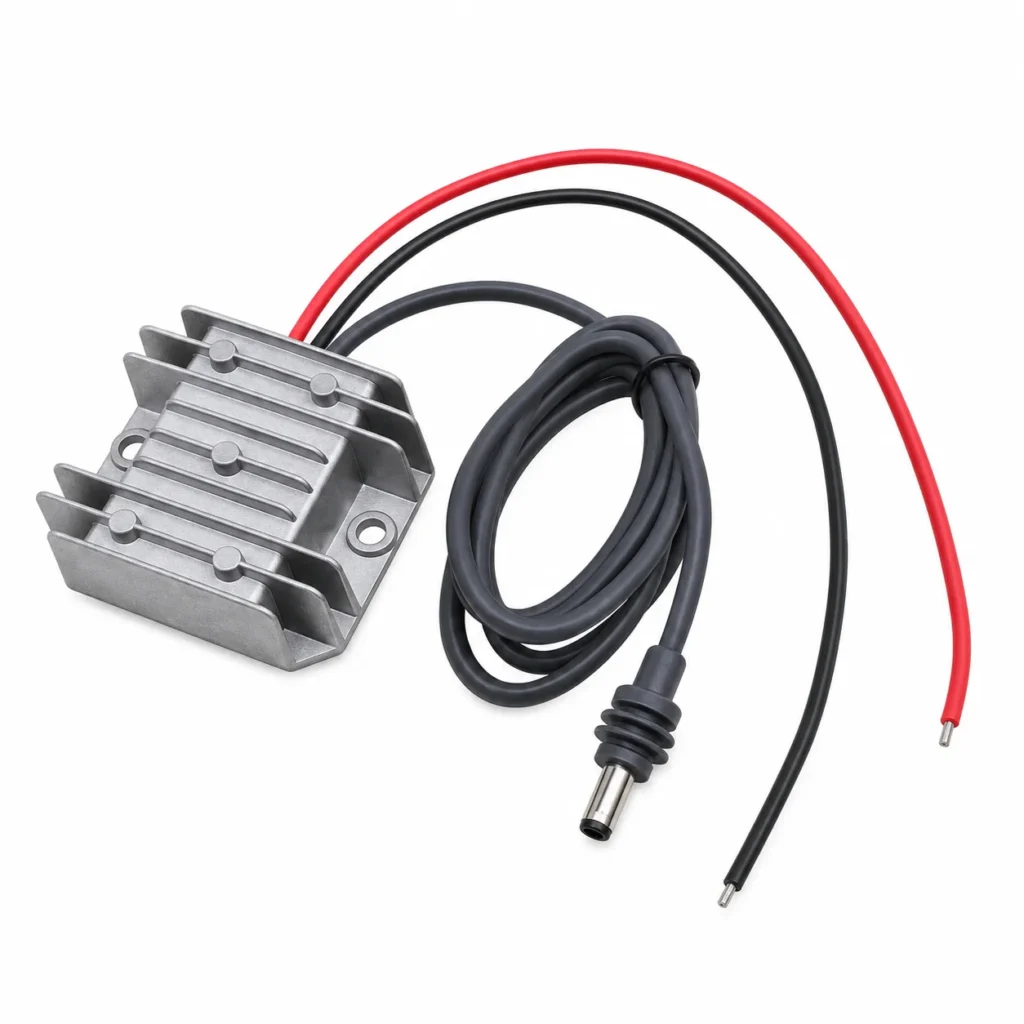
Starlink Mini 12V DC power converter
12V battery supply in, regulated 30V DC out. Compact converter with bare battery input wires and an attached Mini-style power lead, approximately 98cm long.
Pre-order: £34.99 including VAT
First batch on order. Dispatch date to be confirmed; connector fit and operation will be checked before dispatch.
A roof-mounted Starlink Mini deserves a tidy power connection. If your dish stays on a motorhome roof, you probably want its cable routed through a sealed roof entry and its power supplied from inside. There is no need to leave a cable hanging down the side or bring it through an open window every time you stop.
A suitable DC supply can power Mini from a leisure battery without switching on a 230V inverter. The same idea can fit a campervan or a boat with a properly designed house-battery system. Add solar charging and the battery can store energy during the day to support your internet use later.
The basic idea: the battery supplies the Mini through a protected, compatible DC power arrangement. Solar panels recharge the battery through a suitable solar charge controller. The solar controller and a DC power converter do different jobs.
Can Starlink Mini run from a 12V battery?
Yes, provided the complete power arrangement meets its requirements. Starlink specifies a 12–48V DC input, rated at 60W, for Mini. A battery described as “12V” does not stay at exactly 12.0V: its voltage changes with charging, discharge and load. The voltage reaching the dish also depends on the cable and connections.
Starlink’s setup guidance specifically notes that a 12V supply can encounter voltage-drop problems, and suggests a shorter cable, thicker cable or suitable higher-voltage supply. That matters when the battery is inside a vehicle and the dish is some distance away on the roof.
Official options include the Mini Car Adapter and the Mini USB-C cable used with the specified 100W USB Power Delivery source. Starlink states that it only guarantees performance with its included power supply and cable. A third-party hardwired arrangement needs its own compatibility checks.
A permanent roof installation without a dangling cable
For a Mini that stays on the roof, plan the power route as part of the installation. A tidy arrangement keeps the outdoor cable secured, brings it through a suitable sealed entry and connects to the motorhome’s protected internal DC system.
- Choose the mounting position: use a suitable mount and check the dish’s view of the sky.
- Plan the complete cable route: measure the actual path from the power supply to the dish, including routing inside cupboards or service spaces.
- Use the correct roof entry: select a cable gland or entry system suitable for the roof and cable, with proper support and strain relief.
- Keep the supply accessible: locate power equipment according to its instructions, allowing inspection, cooling and convenient isolation.
- Integrate the electrical protection: use an appropriately designed fused circuit and battery protection for the complete arrangement.
A permanent roof mount does not by itself authorise use while driving. Check the current mounting, hardware and service requirements for in-motion operation. Our Mini setup guide covers the dish and app side.
Why use a DC-to-DC power converter?
A suitable DC-to-DC converter, such as our Starlink Mini 12V-to-30V converter, can take the battery supply and provide a regulated output for Mini. For example, 30V is within Mini’s published input range. Supplying the same power at a higher voltage reduces current in that part of the circuit and can help manage voltage drop along the cable to the dish.
A converter is an option, rather than a requirement in every installation. The right arrangement depends on battery voltage, cable length, cable size and the power equipment used. Compare the intended setup with the official Starlink power options before choosing.
Check the converter’s actual input range against the battery system’s charging and operating voltages. Also check output stability, startup behaviour, connector dimensions and polarity. A wattage figure or a “Starlink compatible” description alone does not confirm the complete installation.
Converter output current and battery input current are different. Select input wiring and protection from the complete equipment instructions and circuit design, rather than copying a current rating printed for the output. See our plain-English voltage-drop guide for the underlying idea.
Pre-order the MotorCables Starlink Mini 12V DC power converter — £34.99 including VAT. First batch on order; dispatch date to be confirmed.
Basic battery wiring and extending the input cables
The connection layout is straightforward: the battery positive feeds the converter through a suitable fuse, and the negative returns to the battery negative. If the converter needs to sit further from the battery, extend each input wire through its own suitably rated terminal-block pole or crimp connection. Keep the positive and negative poles separate.
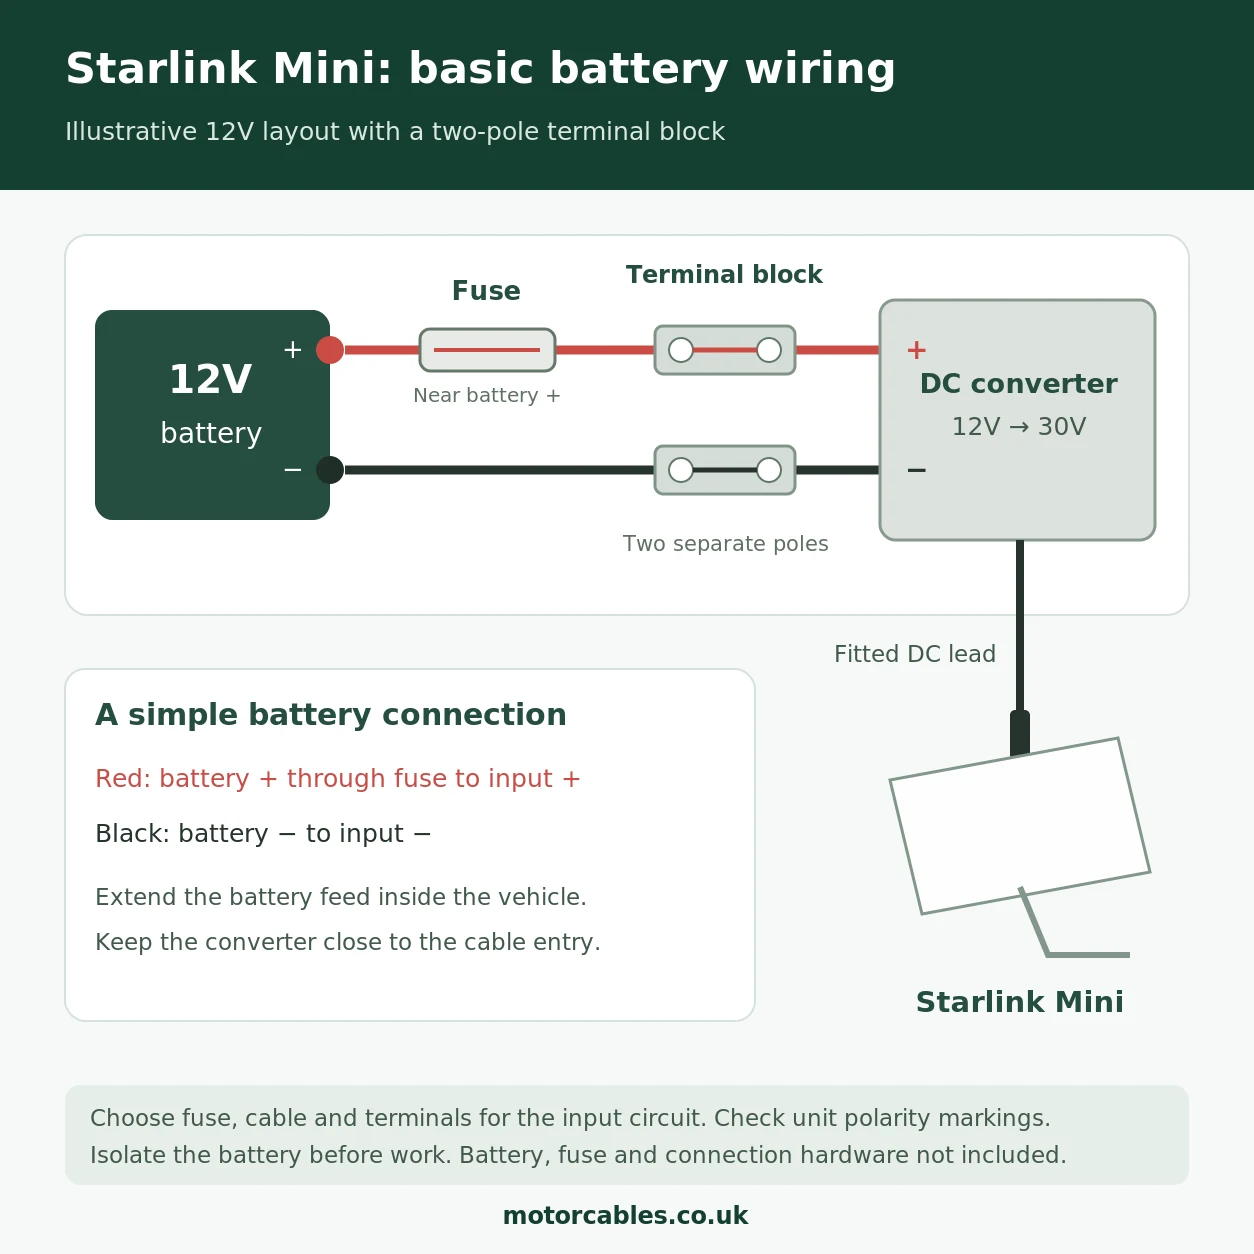
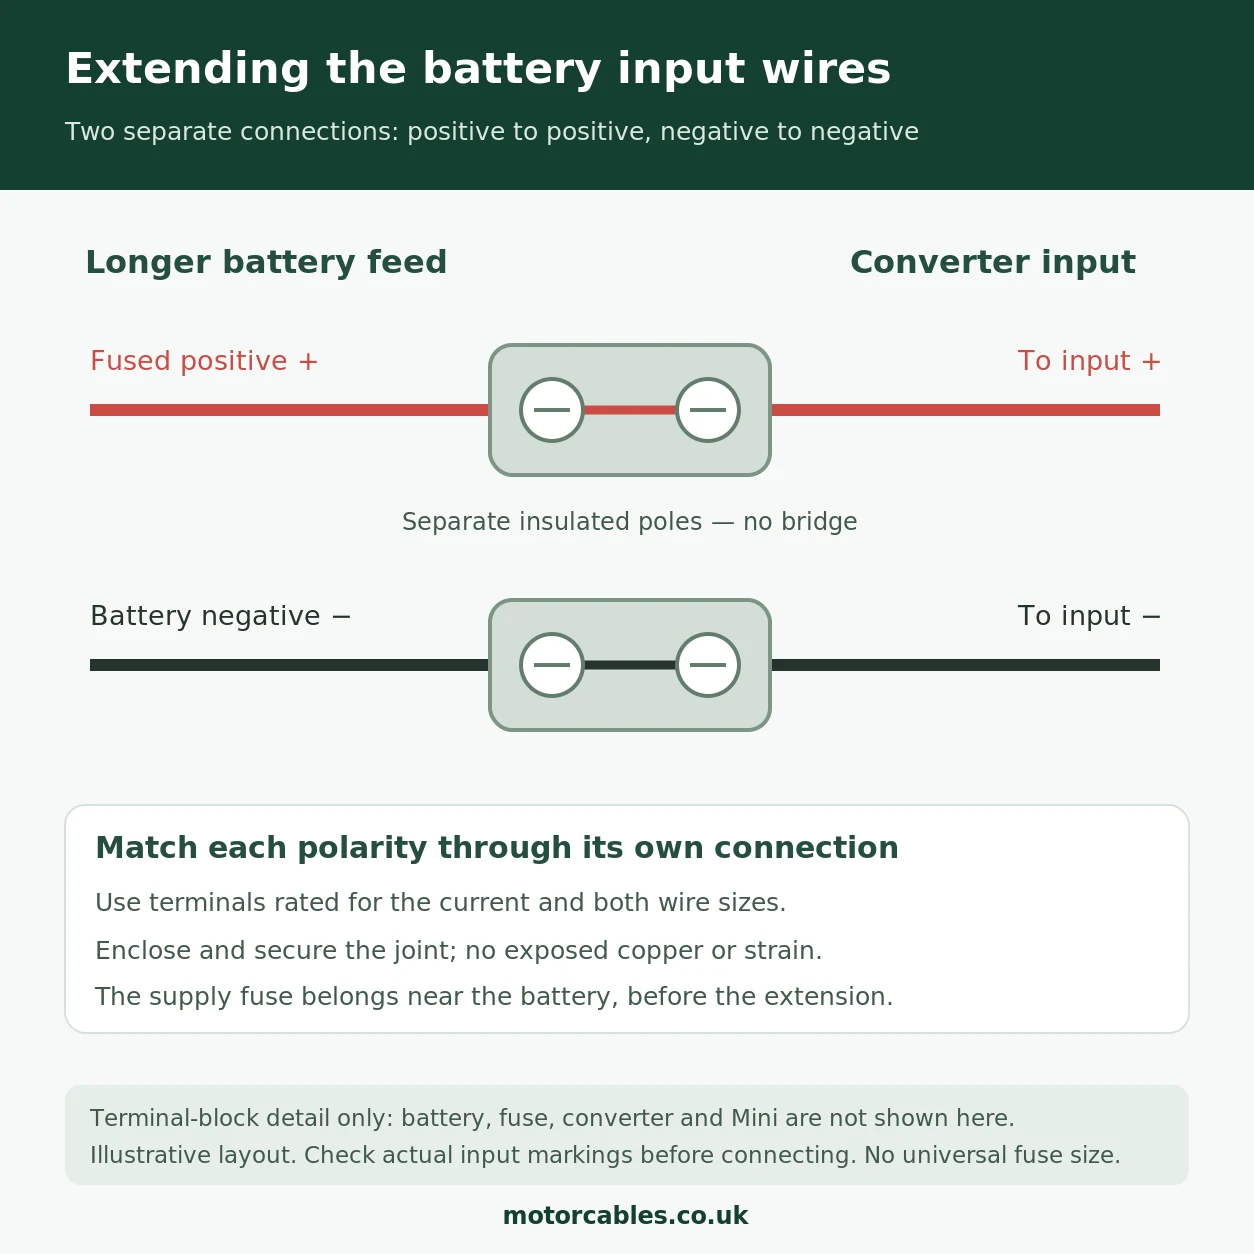
Isolate the supply before making connections. Use a fuse near the battery positive, select the cable and fuse for the input circuit and route length, and enclose and secure the joints with no exposed copper. Check the converter’s actual input polarity markings before connecting. Do not choose a battery fuse by copying its 3.5A output rating.
The fuse rating and input-wire specification for our first batch are awaiting confirmation, so these diagrams do not prescribe a universal fuse value. For the general principles, see Victron’s DC wiring guidance.
How solar panels fit into the system
Solar can replenish the battery that powers your Mini. A typical battery-backed arrangement has these stages:
- Solar panels: produce DC electricity when there is sufficient sunlight.
- Solar charge controller: manages charging for the selected battery type and system voltage.
- Leisure or house battery: stores energy and supports the load through changes in sunlight.
- Protected DC power supply: provides the appropriate supply and connection for Mini.
- Starlink Mini: uses the available power to provide the internet connection.
Use the solar controller’s specified connection arrangement. Some systems have a suitably rated load output; others supply loads through a protected battery distribution circuit. A basic step-up converter is not a substitute for a solar charge controller, and this is not an instruction to connect a bare solar panel directly to Mini.
Panel wattage is not the same as daily energy. As an illustration, 200W maintained for three equivalent full-output hours produces 600Wh before losses; an average 40W Mini load for eight hours uses 320Wh before power-system losses. Those numbers are a planning example, not a prediction of UK solar generation.
Shade, season, roof orientation, temperature and charging losses affect the result. The fridge, lights and other equipment share the energy budget. Solar only replenishes the battery when enough power remains after the running loads are supplied.
How long will the battery run Mini?
Starlink’s current support guidance gives Mini an average consumption of around 20–40W. Actual use varies, and the supply still needs to meet its rated power requirements.
Estimate runtime using usable battery energy × power-path efficiency ÷ average Mini power. The table assumes a 40W Mini load and 90% efficiency for the complete power path.
| Usable energy allocated to Mini | Illustrative runtime |
|---|---|
| 200Wh | About 4.5 hours |
| 500Wh | About 11.3 hours |
| 1,000Wh | About 22.5 hours |
These are estimates, not battery specifications or guaranteed results. Use the battery manufacturer’s permitted usable capacity and discharge limits, and account for condition, temperature, reserve capacity and other loads. If the battery label gives amp-hours, multiply by its nominal voltage to estimate nominal watt-hours before working out how much is available for your use.
For regular use, measure actual consumption in your own installation and check the battery monitor. That gives a better basis for planning the next day’s charging.
How to prevent Starlink Mini draining your battery
Give the converter a way to switch off. Mini continues to use electricity while powered, even when nobody is browsing. A hardwired converter does not automatically know that you have parked or turned the ignition off. To stop this circuit drawing power, disconnect the converter’s battery input so both the converter and dish are off.
Choose the control method around when you want internet:
| Power control | How it works | Best suited to |
|---|---|---|
| Manual DC switch | A suitably rated switch on the fused input circuit turns the converter and Mini on or off. | Internet on demand while parked. |
| Ignition-controlled relay | An approved ignition-switched signal operates a relay, which switches a separate fused battery feed to the converter. | Automatic power-off when the ignition is switched off. |
| Low-voltage disconnect | A separate battery-protection device disconnects the load at a configured battery limit. | Parked use with protection for the battery’s permitted discharge and required reserve. |
For ignition control, the relay switches the converter’s input supply. The main power route is from battery positive through a fuse near the battery, then the relay’s normally open contacts, then the converter’s positive input. The converter’s negative input returns to the appropriate negative connection. A compatible ignition-switched signal controls the relay coil through a properly protected control circuit, with its return connected as the relay and vehicle instructions require. The converter’s output lead supplies Mini as usual.
The ignition signal is a control feed, not a source for the converter’s full input current. Have the installer identify a vehicle-approved take-off and select the relay, coil suppression, protection and cables for the actual system. Do not tap an arbitrary vehicle electronics wire. This is a circuit principle, rather than a vehicle-specific wiring instruction.
Key off means internet off with ignition-only control. For a motorhome, coffee van, tour bus or boat where you want internet while stationary, a switched leisure or house-battery supply with suitable battery protection is usually more useful. Set any low-voltage disconnect according to the battery manufacturer’s guidance, chemistry and required reserve; there is no single cut-off setting for every battery. Do not assume a converter’s generic undervoltage shutdown will preserve enough power to start an engine.
Ignition on does not prove that the engine is running or the alternator is charging. Leaving the key in an accessory or ignition position can still discharge the battery. If you need operation only while the engine is running, ask the installer for a suitable engine-running control signal.
Sleep Schedule is an additional power-saving option. In the Starlink app, open Settings → Starlink → Sleep Schedule and choose the sleep period. Internet is unavailable while it sleeps, and the schedule uses UTC by default. Sleep Schedule does not monitor your battery or isolate the converter. For storage or extended periods without use, switch off the converter’s battery input.
Solar charging can replenish energy, but available sunshine and other loads still determine the battery budget. Our converter does not include the separate switch, relay or battery-protection device described above.
What about using a car’s starter battery?
A suitable car-battery supply can power Mini through compatible equipment, but the starter battery also has to start the engine. Running electrical equipment while parked with the engine off can leave insufficient starting capacity.
Check the vehicle’s instructions, the power outlet’s rating and whether it remains energised when parked. Use an appropriate supply and battery protection; do not assume every accessory socket or generic converter is suitable for the intended use. For extended stays, a separate leisure battery gives you a more suitable power budget.
The same distinction matters on a boat: preserve the starting reserve and plan domestic loads around the appropriate house-battery system.
Planning a boat installation
The appeal is similar afloat: a permanently mounted Mini with its power supplied from the vessel’s internal battery system can make connectivity more convenient at a permitted location. Cable routing, mounting, weather exposure and the electrical arrangement need to suit the boat.
Preserve the specified connector seals and protect equipment from the conditions it is not rated to withstand. An enclosure’s IP marking does not establish that every cable connection in the installation has the same protection. Have a competent marine electrical installer assess changes to the vessel’s system.
Power and internet-service coverage are separate choices. Check the current service rules for inland, coastal, offshore and in-motion use before relying on a connection.
Before you choose a battery power setup
- Identify the battery system: voltage, chemistry, normal charging range and usable capacity.
- Choose the complete power arrangement: supply, cable, connector, polarity and the intended Mini model.
- Measure the cable route: include the path through the roof and vehicle interior, with suitable support and protection.
- Specify circuit protection: appropriate cable size, DC fusing, isolation and low-voltage protection. A battery-fed circuit needs protection located to protect its supply cable.
- Plan the solar energy budget: allow for all the loads and the conditions in which you will travel.
- Commission the finished installation: verify operation and startup with the actual Mini, check voltage at the equipment under load and inspect operating temperatures.
Use the component instructions and a competent vehicle or marine electrical installer for a permanent installation. This guide explains the choices; it does not specify a universal fuse value, wire size or terminal-by-terminal wiring procedure.
Continue the Starlink series
- Living off grid with Starlink: vans, motorhomes and remote living.
- Starlink Mini setup: from unboxing to Wi-Fi.
- Starlink or 5G? Choosing mobile internet.
- Pausing Roam and restarting between trips.
New to Starlink? Explore the £40 referral offer
Eligible UK new customers can receive £40 cash or Starlink service credit when joining through our referral link, subject to Starlink’s current conditions.
Referral disclosure: we may receive a reward when you join through our link. Qualifying customers must order directly through the referral link, activate and remain subscribed for two full monthly billing cycles. Check the offer, eligible plan, reward options and verification requirements before ordering. Retail purchases and account transfers do not qualify under the stated referral rules.
Battery and solar power FAQs
Can Starlink Mini run from a leisure battery?
Yes, with a compatible, protected DC supply and the correct cable and connector. Mini is rated for 12–48V DC input at 60W. The installation must maintain suitable voltage at the dish, including during startup and when the battery voltage changes.
Can I power Starlink Mini from a car battery?
A suitable vehicle battery supply can power Mini through compatible equipment, but running accessories with the engine off can discharge the starter battery. Preserve starting capacity and use appropriate battery protection. A separate leisure battery is better suited to extended stops.
Can solar panels power Starlink Mini?
Yes, as part of a correctly designed solar-and-battery system. Solar panels feed a suitable charge controller, which charges the battery; the battery supplies Mini through the protected DC power arrangement. A basic DC step-up converter is not a solar charge controller.
Do I need a 230V inverter for Starlink Mini?
No, a suitable DC power arrangement can supply Mini without a 230V inverter. Starlink offers official DC-powered accessories, and a third-party installation needs a power supply and cable that meet Mini’s requirements. A DC converter still consumes some energy.
Is a 30V converter suitable for Starlink Mini?
30V is within Mini’s published 12–48V DC input range. That alone does not establish that any particular converter is suitable: input range, output stability, startup performance, capacity, polarity, connector fit and environmental protection all need checking.
Can I permanently mount Mini on a motorhome roof or a boat?
A suitable permanent mount and sealed cable entry can support a tidy installation. Follow the equipment and mounting instructions, protect and support the cable, and preserve the required connector seals. In-motion use also depends on compatible mounting, hardware, location and service-plan rules.
How long will a leisure battery run Starlink Mini?
Runtime depends on usable battery energy, actual Mini consumption, power-system losses and other loads. For example, 500Wh allocated to Mini, a 40W load and 90% power-path efficiency give about 11.3 hours. This is an illustrative calculation, not a guaranteed runtime.
Sources and further information
- Starlink: Sleep Schedule settings and limitations.
- HELLA: automotive relay operation and separate control and load circuits.
- Victron: low-voltage load disconnect and remote switching examples.
- Starlink Mini specification sheet and Mini setup and 12V supply guidance.
- Starlink’s supported power sources and published power-consumption guidance.
- Victron: example solar charge-controller system and DC load arrangement.
- Victron: factors affecting solar charging output.
- AA: battery discharge from parked-vehicle electrical loads.
Information checked on 12 November 2026. Consult the current instructions for the exact equipment and installation.